
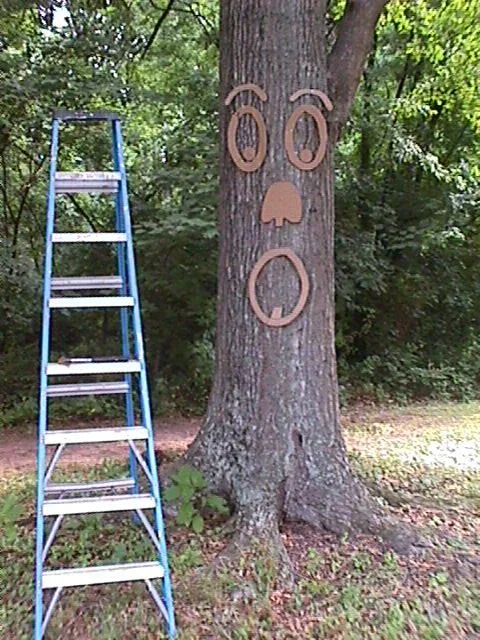
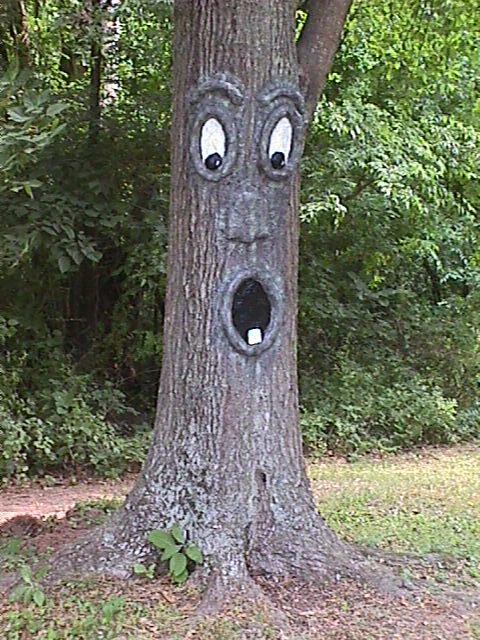
Visitors to the Mary Snoddy garden often comment on the large “face” on one of our oak trees. Confession: This is a complete human creation. It is NOT based on the tree’s natural scars.
Why purchase a pre-made “face” when you can create your own — with personality! Here are step-by-step instructions. Please read all steps before you start, and use tools and products with care. Summertime gardening chores are just a few weeks ahead, and you will need all your fingers to plant and weed!
Step 1
Select a tree. A larger tree is easier than a smaller tree, because the surface curves less. Keep in mind that you will be painting the face to match the bark. For those of us with limited artistic skills, oak bark is easier to mimic than pine.
Step 2
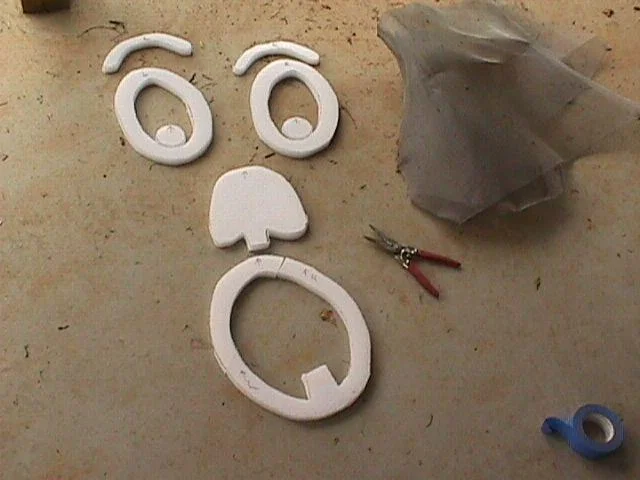
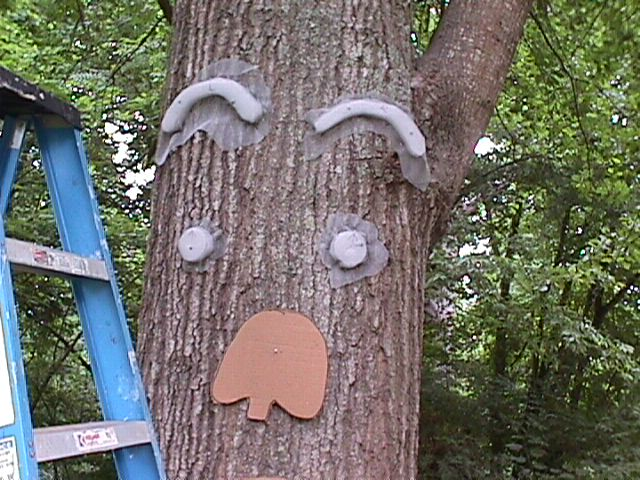
Use scrap cardboard to sketch your eyes, nose and mouth. Cut out the pieces using metal shears or old scissors. Using 1-inch brad nails, tack the cardboard lightly onto the target tree. Adjust the size of your cardboard items up or down until the fit seems right for the tree. Be sure to allow plenty of space between each of the pieces.
Step 3
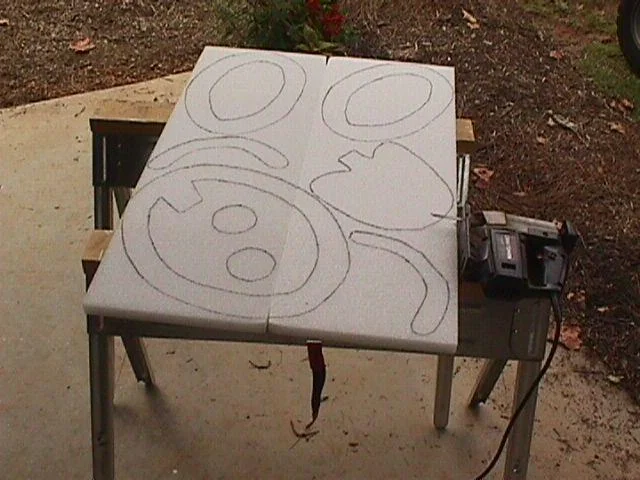
After the sizes and shapes look okay, remove them from the tree and place on a 1-inch thick piece of styrofoam. I removed mine one at a time, to be retain ideal spacing on the tree. You can either use the pink sheets of construction insulation foam sold at home improvement stores such as Lowe’s or Home Depot, or buy smaller sheets at craft stores like Michael’s. My design took two sheets of 24” x 36” foam. Wear safety glasses and use caution as you utilize a jigsaw to cut out the designs. If a mishap occurs and one of the design pieces breaks, it’s okay.
Step 4
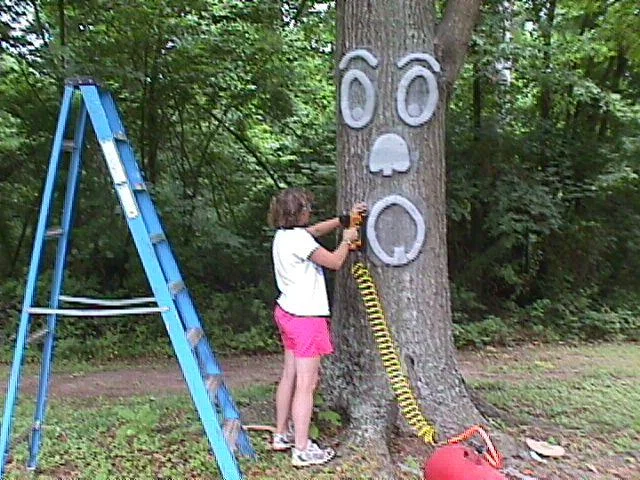
Using 1 ½ inch galvanized nails with large heads (roofing nails are ideal), nail the styrofoam directly to the tree. Each piece will need two or three nails to hold it securely. Don’t use longer nails — You want to attached to the bark, not penetrate the tree’s cambium layer.
Step 5
Using the same cardboard patterns, cut pieces of screen wire in the general shape of the design piece. Add at least two inches larger in all directions, so that you can overlap the styrofoam and have plenty of extra screen to staple onto the tree. Any excess can be cut away with metal shears after it’s on the tree. These screen pieces will serve as the base for Step 7.
Step 6
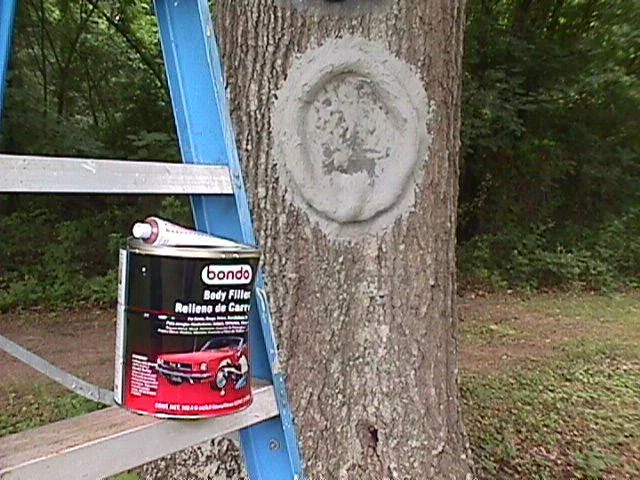
Use a staple gun to attach the screen wire over the styrofoam pieces. I used a pneumatic stapler to make the process faster, but a manual construction stapler works just fine. (Don’t try to substitute a regular office-type stapler. They are not strong enough to penetrate the bark and their staples are not long enough.) I used 11/16” staples. You can see the excess screen on the photo below, left. I trimmed a small amount after it was attached.
Step 7
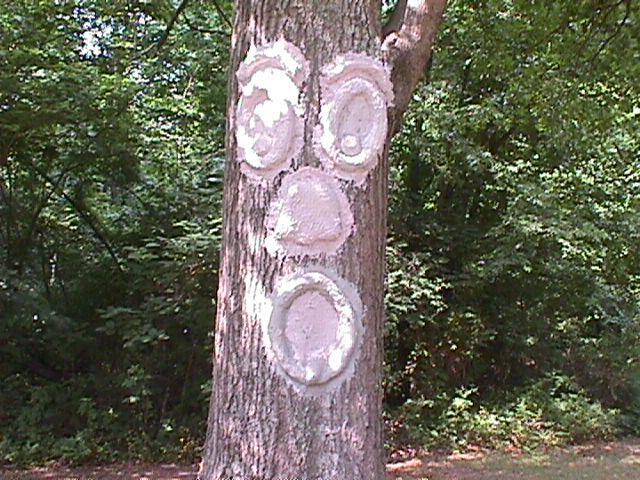
Now, the messy part. Wear your safety glasses and disposable latex gloves for this step. Mix Bondo (an automotive body filler, available at big box stores and auto parts stores), using a little less of the hardener than called for on the can. Mix only small portions at a time, because it hardens and becomes unworkable FAST. Use a putty knife to smooth the bonding agent right onto the screen wire. This process takes a while. Don’t be tempted to hurry it along by mixing larger amounts of Bondo. The surface will be somewhat rough. That is okay, since bark is not smooth.
Step 8
After the Bondo is hardened, it’s time to paint. This is the most difficult part, and the most time consuming, because you must allow drying time between coats. Start by painting the entire face with a base coat closest to the tree’s main bark color. I found gray with a little brown paint mixed in was the best base. Allow your inner-Picasso to emerge. Dab on colors as needed until the design matches the bark. Paint the black and white portions of the eyes and mouth as the last step. Pictured below is my final Tree Man. He is approximately five feet from top to bottom (eyebrows to snaggle tooth).
Here is a complete list of the materials needed.
Cardboard
Metal shears or an old pair of scissors
Styrofoam sheets
Jigsaw
Screen wire (metal, not nylon) – Old wire is fine. Rust doesn’t matter.
One gallon can of Bondo (fiberglass for automotive dent repairs)
Several shades of exterior enamel paint (gray, brown, green, white, black)
Putty knife
Stapler
Disposable paint brushes or foam pads
Latex gloves
Safety glasses
Ladder, if needed, to reach top of design