Garden maintenance

Pre-Winter Propagation Chores

It is Thanksgiving week, and I am concentrating on hosting family and friends rather than researching cool plants. Instead of my normal format, I want to share a few photos of my pre-winter tasks. Other than a single cold snap in October, this year’s autumn has been unusually warm. This means that I had extended time to take a few cuttings for rooting in the greenhouse, as a head start on next gardening season.

A green-and-white container combination seems fresh and cool in the hottest part of the summer. I like to combine Cuban Oregano with variegated ivy and Diamond Frost Euphorbia. The Cuban Oregano (Plectranthus variegata) shown here was a gift from my friend Ann in 2009. The plant is not cold-hardy, so I have overwintered a few cuttings every year since then. It is a wonderful memory of our friendship. I take more cuttings than I need as insurance against rooting failure, so I have extras to share. Six weeks ago, I started four branch tip cuttings to take advantage of apical dominance – plants like to grow from their tips -- in a recycled, sanitized four-pack. They rooted well, so graduated this week to four-inch containers.

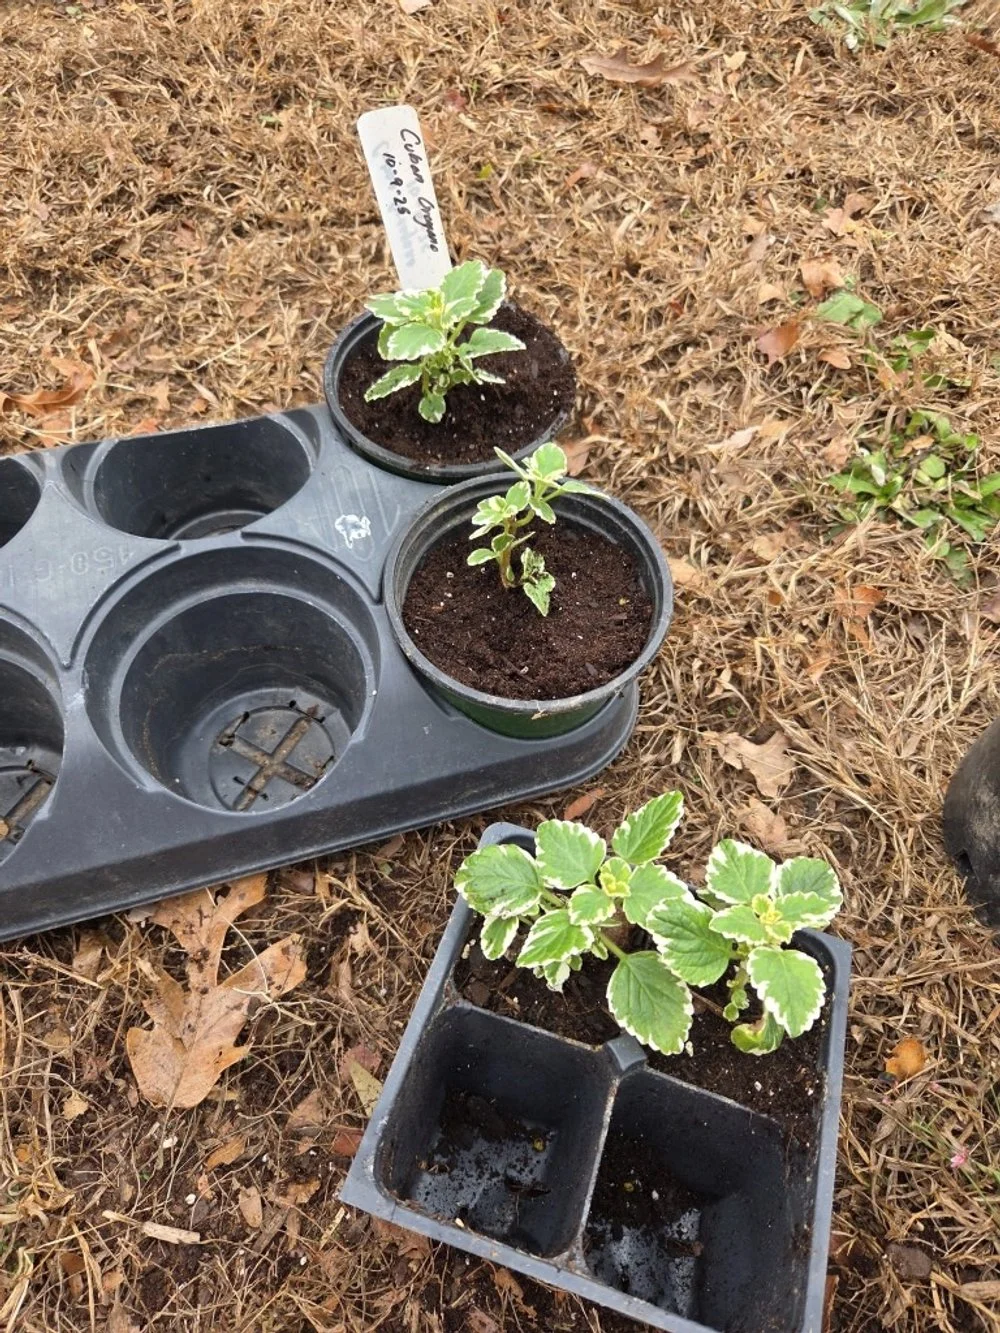
Cuban Oregano (Plectranthus variegata) is moving from a 4-pack to a 4-inch container.

I adore the succulent groundcover Mezoo. It has gone by several genus names, including Aptenia, Doreanthus, and Mesembryanthemum. I do not know which one of these is correct, so I rely on the common name in my labeling. Mezoo roots readily and grows fast, so I stuck my cuttings in two-inch plugs. Most have rooted and are ready to graduate to four-inch pots. In late February, they will need to move up again, to one-gallon containers.
About that labeling: the plant labels you see here are sections of an old window blind. A single damaged vinyl blind (cat owners, IYKYK) can be recycled into a lot of plant labels. The slats are flexible enough to cut to the preferred length with kitchen shears, and strong enough to last. They don’t rot or rust. For plants that will go into the ground without their labels, I use a Sharpie Extreme marker on the blind. The Extreme will withstand UV rays and frequent watering without fading. For transplants that will have their identifying label planted along with the plant itself, I use weather-resistant tape on a Brother P-Touch Label Maker. Some of these have lasted more than five years for me. Sadly, a few have outlived the plants they identified. 

Small green and white plants in plug trays and 4-inch pots

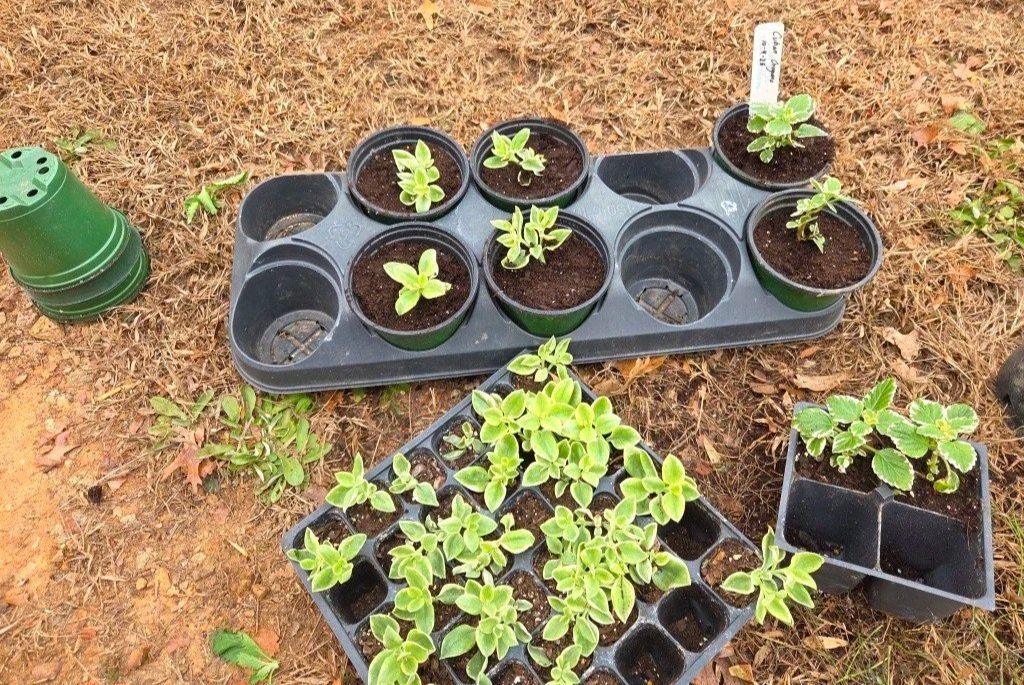
Lovely, heat-tolerant, succulent groundcover Mezoo is moving from plugs to 4-inch pots. It will share a tray with Cuban Oregano, since they both prefer drier conditions in the greenhouse.

I took a few cuttings of favorite annuals, Alternanthera ‘Purple Prince’ and Coleus ‘Freckles.’ Here, you see that I have removed the Alternanthera from its four-inch container to confirm that it has enough roots to move up to a one-gallon size. I do not know the science behind it, but plants prefer to move into slightly larger containers. If a two-inch plug goes directly into a three-gallon container (I exaggerate, but you get the point), it will languish and fail. That same rooted two-inch plug will move successfully to a four-inch container. Once that four-inch container has roots showing around the bottom and sides, it can be bumped up to the next size, and then again once that pot shows roots around its outside perimeter. To ensure the good health of a plant, move it to the next larger size before it gets rootbound, meaning that the container is overfilled or choked with roots. Even though I am using round pots in these photos, I far prefer the square pots. There seems to be less root girdling with squares than with rounds. Rounds have the advantage of using less potting soil.  

Hand holding plant showing roots

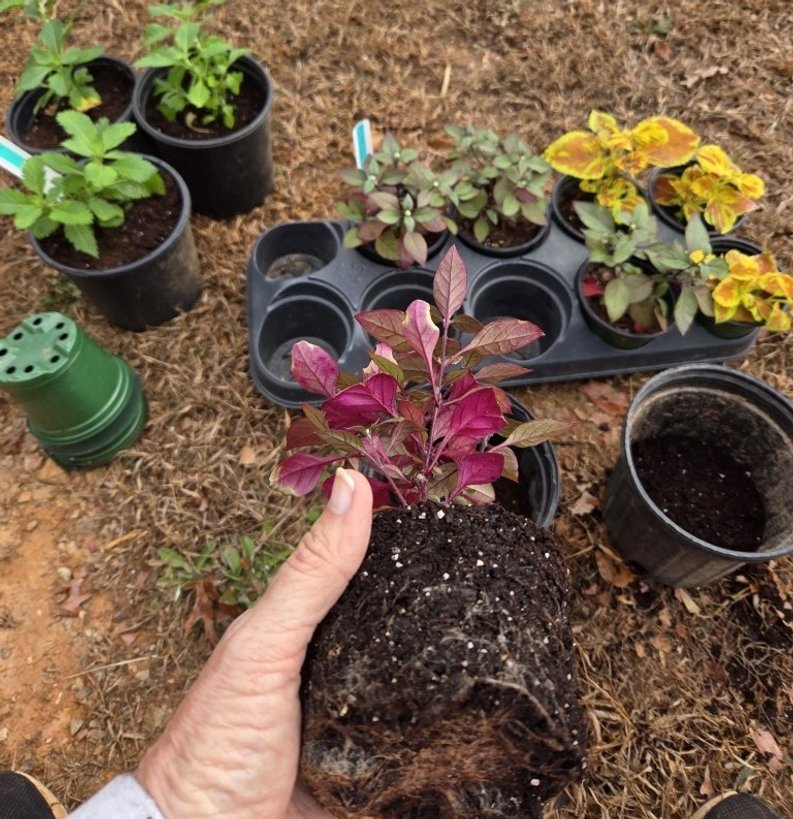
Checking that the cutting has rooted well enough to move to the next size container.

Here, I have moved the Alternanthera, the Coleus, and Centrantherum (“Lark Daisy”) to one gallon containers for the winter. And here is my final gardening tidbit for this blog: To apply the time-release fertilizer that will keep these plants well-fed until spring, I took an empty plastic one-quart container, washed it well, and used a small bit to drill a bunch of holes in the plastic lid. This works like a large salt-shaker to apply fertilizer (or any pelletized product) easily and evenly. I have multiple lids, with different diameter holes. Milorganite, for instance, is a small pellet that requires a smaller gauge hole for ideal distribution.

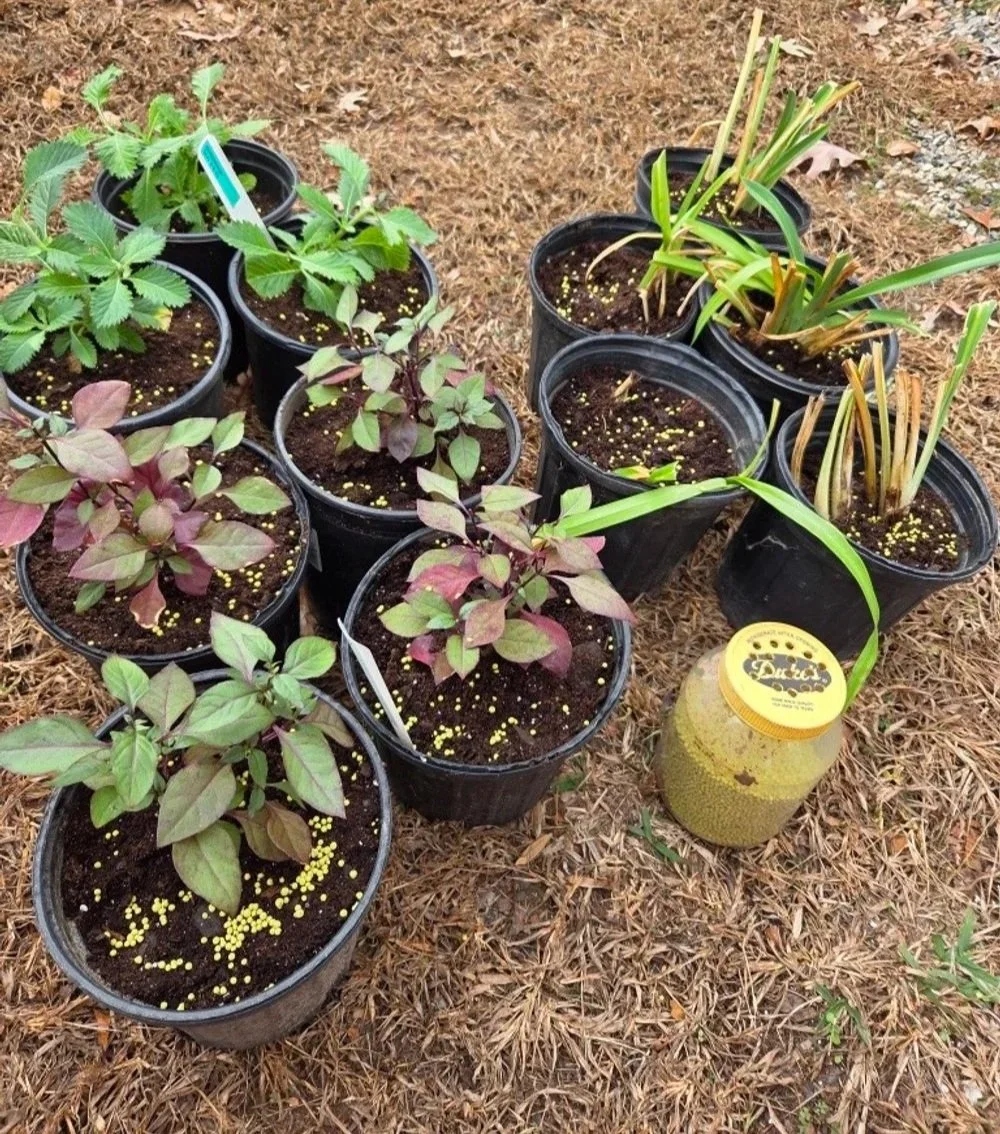
Alternanthera, Centrantherum, and a few Daylily divisions are potted up and ready to overwinter in the greenhouse. I pinched the growing tips and removed the flower buds to encourage stocky, well-branched specimens.

 Happy Thanksgiving to you and yours.

Why Soil Prep and Plant Maintenance Matter

If you have ever wondered about whether soil preparation was really critical, or if that was just an “in a perfect world” condition, let me share my personal experiences. This spring, I started a new planting bed in an area that had been compacted by construction equipment. In some areas, I carefully dug and amended before planting. Other areas (I got tired and impatient), I just chiseled holes in the sticky red clay of upstate SC and plopped in seedlings. Thankfully, the holes of shrubs and perennials were all loosened and amended. The annuals did not receive the same care because, well, they are annuals.

Here are three examples demonstrating the difference that soil preparation can make. I have not fertilized the plants in these photographs.

Seedlings of the puny trio of Melampodium on the left were placed into unprepared soil three months ago. The trio on the right was installed in loosened and amended soil. They are twenty-two inches tall. These plants came from the same package of seed, were installed the same day, and are only a few feet apart, so they get the same sun exposure.

These Gomphrena seedlings were started from the same seed pack and placed in the ground the same day, three months ago. The plant on the left was placed into unprepared soil. It is five inches tall. The plant on the right was placed into soil amended with a shovelful of soil conditioner. It is twenty-two inches tall. These plants are in the same bed, a few feet apart.

Just like the examples above, these Zinnias were started from the same seed pack and seedlings were planted out the same day, only a few feet apart. The one on the left, placed in unamended soil, is a single stem, four inches in height. The one on the right, planted into amended soil, is well-branched and fifteen inches tall. I feel guilty every time I see the runts.

The final photograph, below, shows what happens when maintenance is ignored. Certain tall plants are prone to “spraddling” later in the season, especially after a hard rain. In early spring, I tip-pruned my Mexican Salvia and Joe Pye Weed. They branched obligingly, and are about two-thirds the height they would have been without the cutback. Joe Pye flowers are starting to open, and the Mexican Salvia will flower in another six weeks or so. I neglected to cut back the Brown-Eyed Susans (Rudbeckia triloba) and last week a thunderstorm took the flowers to the ground, where they remained. I was forced to cut plants back to about a foot. They will recover and produce a few late flowers, but I lost the exuberant show and strong stems that an early cutback would have produced.

These Brown-Eyed Susans were forty inches tall, in full bloom. Then the rain came, and down they went.

The message of this blog: Take whatever time is necessary to properly prepare soil before installing plants. Heavy clay can be improved with soil conditioner, compost, or leaf mold. When you backfill the holes with amended soil, just firm it by hand enough to ensure good root-to-soil contact. There is no need to stamp it like you are angry with Mother Earth. Plant roots need oxygen to thrive.

The Chelsea Chop

What is “The Chelsea Chop,” a term I hear from professional garden-tenders? In simple terms, it is a mid-season cutback for flowering perennial plants. It earned its catchy moniker in the UK, where border plants are pruned hard around the same time as London’s famous Chelsea Flower Show (May).

American weather, soil type, and growing season differs from lands across the pond, but a mid-summer cutback is a great idea for many plants, including Yarrow (Achillea), Coneflowers (Echinacea), Artemisia, Catnip (Nepeta), Bee Balm (Monarda), Salvia, and Gaura. If a perennial blooms well during spring and fall but takes a flowering siesta in the hottest part of the summer, it may be a good candidate for the chop. Pruned perennials will often branch and produce new buds and leaves, with a rounded, tidy appearance. Annual flowers do not respond as well as perennials. I applied the Chelsea Chop to annual Spider Flower (Cleome) last year and was left with a bed of headless stems that neither branched nor rebloomed.

When orange Butterfly Weed (Asclepias tuberosa) sheds its flowers, a cutback by half will often spur a second bloom that rivals the first, and new foliage looks fresher than older, tattered leaves and stems. Butterfly larvae seem to prefer the tender new stems over tougher, aged ones.

When pruned in mid-June (upper SC area), fall-flowering Aster, Joe Pye Weed, Chrysanthemum, and NY Ironweed (Vernonia) will bloom about two weeks later than unpruned plants and will have smaller but more numerous flowers. Pinching out the growing tips of tall Sedums (“Autumn Joy” and the like) will cause branching and prevent their tendency to fall open at their centers during peak fall bloom time. With few exceptions, I halt serious perennial surgical reductions on July 4. Later pruning may remove flower buds or cause a growth spurt of tender growth that will later be damaged by early cold spells.

An exception to this timing recommendation is my treatment of Daylily (Hemerocallis). These reliable bulbs flower during the hottest part of the year. When the flower show is over, the foliage starts to brown and dry into an unattractive, stringy blob. I do not have the time to remove each brown leaf individually, so once all flowers have faded, I gather the foliage of each clump and decapitate it, leaving four to six inches. Then, I give the buzz-cut plants a drink of liquid fertilizer. While they will not repeat flowering, they will push out new, bright green foliage that looks good all the way into fall. This approach does not seem to weaken the plant or reduce flowering in future years.

Rather than performing a wholesale chop-chop-chop on everything, I follow advice I read years ago in a wonderful book, The Well-Tended Perennial Garden: The Essential Guide to Planting and Pruning Techniques by Tracey DiSabato-Aust (Published by Timber Press in 2017, also available in Kindle version). I cut back half the plant in June and leave the other half to flower on its original schedule. Sometimes I prune the perimeter of the plant and leave the center untouched, and sometimes (when I’m feeling especially patient) I select every other stem in the overall bunch to reduce. When the latter approach is done carefully, an observer does not notice any pruning has been done. See the accompanying before and after photos of Shasta Daisy ‘Becky’ for an example. The removal of roughly one third of the bloom stems is unnoticeable. If the half-chop method is used, remove spent flowers from the early flowering, unpruned stems or the plant may put its energy into seed-making and not produce a second round of blooms. 

As tempting as it is to use a hedge-trimmer for a quick pruning job, the best results come from pruning individual stems back with hand pruners, cutting just above where a leaf joins the stem. The prune-to-a-leaf method eliminates naked stem orphans that will darken and wither, and may offer an opportunity for disease entry.

All plants look better when dead flowers are removed. But please, remove the entire stem down to the first leaf or even shorter. Do not snap the flowers off and leave headless stems. That’s just creepy.